Pages

8.29.2011

Mojo Monday 20


I needed to make a birthday card so I turned to Mojo Monday for some inspiration!


The card size is 5x5.
All product Close to My Heart unless otherwise noted.
Cricut© Art Philosophy Collection Cartridge
Paper Pack: Fanfare
Cardstock: White Daisy, Cranberry, Pacifica
Exclusive Inks Stamp Pads: Sunny Yellow, Cranberry, Pacifica
Red Sparkles
Clear Inspiration Button
Miscellaneous yellow ribbon
Cuttlebug and Swiss Dots embossing folder


This card turned out to be a different look than I normally do--but that is the fun of doing these challenges!
Thanks stopping by!

8.25.2011

Heart to Heart Challenge


I now have a teenager! So hard to believe.
Thanks to the CASE Challenge at Heart to Heart Challenges , I didn't have a problem coming up with a card. Which is a good thing, being that I didn't get started on it until 11:30 p.m. the night before his birthday! We were to pick a card from one posted by the Design Team and CASE it. (CASE stands for Copy And Share Everything)
Haley's card spoke to me so I chose it to help me with the birthday card I was to create. I love the colors in Close to My Heart's new paper pack called Dreamin'-which is what Haley used. She also used a pattern from the Wishes Card Confidence Program book. Since I didn't have the Dreamin' Paper Pack 2 days ago (woohoo--I do now!! It just came this morning. Oh what a happy day!), I used cardstock in the colors of Pacifica and Goldrush.
I also had some old B&T paper in Goldrush that I used for that smaller rectangle.
The banner was cut from B&T from the old paper pack Free Spirit.
I modified the Wishes Card Confidence Program pattern and made my card a bit smaller. The "Top Band" pattern on page 100 of the Wishes book calls for the card to be 8" inches. Mine is only 6 1/2".
Stamp sets that were used: Friendship Alphabet Small, Party Pennants and the stamp set from last month's You and Me Special.

This is my first time to play along in the Heart to Heart Challenge. I hope to get some more of their August Challenges done and the also the Scrapbooking Challenge, I love the current sketch. First though--I have a busy weekend planned with a 13 year old's birthday party!

8.22.2011

Saturday Scrap Challenge #2

For this Challenge we were to use a ticket or tag on a traditional double page layout. No kits, no sketches, no digital images-just basic fun scrapbooking. Check out all the details on Scrap It Girl's blog.


I created another speedy layout for this challenge. This vacation was in 2008 and have it hasn't been scrapped yet! We were in Arizona for a week and I took tons of pictures. I don't want to spend the time to make elaborate layouts for this trip (or it may be a few more years till it's done!)--well, the trip included a visit to the Grand Canyon, I'll probably spend more time on those pictures! To qualify for Scrap it Girl's layout I added a tag to this layout--it may be stretching the idea of what a tag is--but hey--it is the shape of a tag!

I had Close to My Heart's Moon Doggie paper pack that had not been used and I don't see any tropical vacations in my future. The colors were great with these pictures, and since I was using the word "exotic", I was happy to use them for this layout!

Thanks for looking in today.
Have a great Monday!

8.19.2011

Craftaholics Anonymous Blogiversary

Linda over at Craftaholics Anonymous had a giveaway everyday this week to celebrate her 2cnd blogiversary! The daily giveaways are fantastic, and to top it off, she is so nice that she is giving you until the 23rd to enter each days giveaways! Click on her button in my sidebar and you will be taken there to see all the goodies!

Mark Your Calendars

For my next workshop, we will be creating this adorable layout using the new paper packet called Mischief. So mark your calendars for Friday, September 23rd. We will start at 6:30.


Cost of the workshop is $29.95.
Your kit will include:
1-Mischief Level 2 Paper Packet
1-My Acrylix Mischief Workshop Stamp Set
1-Midnight Felt Shapes
1-Instructional Brochure
Lots-of food and fun!

I will need order kits by September 15th, so RSVP no later than September 15th.

8.17.2011

Awesome Specials!


I can't believe I have let half the month go by with out telling you about the great specials Close to My Heart is having. Well--one of these specials just started on the 15th, so I really waited so you could get the most bang for your buck! OK--get ready--let's see if you can follow all of this!

With the release of the Autumn/Winter Idea book the beginning of this month, CTMH has changed the Stamp of the Month program. The Stamp of the Month can either be purchased for the full price of $17.95 or it is only $5.00 when you have a $50 order.


EXTRA, EXTRA!!
In celebration of our newly updated Stamp of the Month program, Close to My Heart is throwing in a little something extra: a FREE bonus stamp set! In August, when you place an order of $50 or more in products and purchase the August Stamp of the Month set, Wicked, for just $5, you’ll receive the My Acrylix® A Typeface A-size set FREE (a retail value of $6.95). Think of this as two promotions in one—qualify for and purchase the discounted August Stamp of the Month set and get a second stamp set FREE! It's Extra! Extra!


NATIONAL STAMPING MONTH
To celebrate National Stamping Month in September, Close to My Heart is offering their first-ever double stamp set! You can get the exclusive My Acrylix® Pair-a-Phrase double stamp set FREE when you place an order of $75 from August 15 through September 30, 2011. You'll love this double set—two D-size sets in one envelope—which includes lots of clever phrases and coordinating images you'll use in your handmade cards all year long. The double set has a retail value of $35.90, which drastically increases the value of your qualifying purchase! Have double the fun stamping during National Stamping Month with our new Pair-a-Phrase double stamp set!

Can you believe that? What awesome deals. OH--and I have to tell you another piece of exciting news. The price of stamp sets in the new Idea Book have gone down! Yes--that's right--No--I'm not kidding, they went down!

I can't let you go without telling you about another awesome thing about Close to My Heart--are ya ready? Hold onto your chair--
Close to My Heart has partnered with Provo Craft and we now have an exclusive cartridge for the Cricut cutting system!

The Art Philosophy cartridge has 700 shapes and many are designed to be used with specific My Acrylix stamps.
When you purchase the Art Philosophy cartridge, you'll also recieve three exclusive D-size stamp sets that are designed to coordinate with images on the cartridge. Plus, you will receive three sets of 9" x 12" Dimensional Elements that also work with the cartridge.
If you own a Cricut, this Close to My Heart package is one you won't want to pass up!

I know--too much info for one post! Please ask if you have any questions.
Have a fantastic evening!

8.16.2011

6 x 9 Kraft Mini Tutorial

I've been asked to go into some detail on my Follow your Dreams mini album which is made from 6 x 9 kraft envelopes. You can see it here.
This is a quick tutorial, please ask any questions if it is not clear here!

First, you start with a 6 x 9 Kraft envelope.
Fold the bottom up to the fold of the envelope flap.
To create the large flap for your mini album you will need two different pieces of B&T paper. One is cut to 8" x 6" with a score at 3 1/2". (Twighlight piece in picture.) The second piece of B&T is 5 1/2" x 6" and scored at 2". (Smoothie piece in picture. The score goes across the 6" side)
The 2" section of the Smoothie piece gets tucked into the kraft envelope and the score and fold of envelope flap should match up.
Use your adhesive on the kraft envelope flap to adhere to this smaller piece of B&T. Note: that green you see is the back of the 5 1/2" x 6" Smoothie piece. IMPORTANT: Do not put adhesive on the smaller flap that is tucked inside the envelope, this needs to be able to move.


Now take the larger piece of B&T, the score lines up with the fold. This whole piece is adhered to the envelope and the B&T from opposite side. You have now covered the fourth page and created the flap. This envelope creates the first four pages (plus flap) of your mini album.

Flap open.

Flap closed.
And the 4th page.Measure and cover the three other pages--that would be pages 1, 2 and 3 of your album.
Your next envelope will be pages 4-8 of the album.

For the cover I used cardboard from a cereal box and cut two pieces that were 6" x 5". I covered the inside front cover with cardstock before adhering it to the first envelope; the back cover is adhered to the last pocket page.
In this picture; the back cover has smoothie cardstock on it (far right). The striped paper from the You and Me paper pack is on the envelope. You can see where I used an oval punch so you can pull out the tag from the pocket. (tag in this pocket is Chocolate matted with Creme Brulee)

Last, I punched holes through all and used book binding rings to hold it together.
I hope this helped. Please let me know if you need more information.

Garden Journal


This is something I wanted to make last summer but never got around to. I have found that my problem with getting things DONE, is simply getting it STARTED! Once I got started on this garden journal, it hardly took me any time at all to finish. So many ideas, so little time.

The front and back covers are 5 x 7 pieces of cardboard. For the front, I tore off the top layer of paper, to show the corrugated inside of the cardboard. I then distressed with a cream color acrylic paint, let that dry then swiped it with my Chocolate ink pad.

The piece that is stamped on is a piece of Colonial White cardstock. Direct to paper, I took the Honey ink pad and swiped it back and forth. I then sprayed Peach Delight Glimmer Mist over it and rubbed it in with a paper towel. Let that dry and stamped images from Treasure Life (still love that stamp set) in Chocolate ink. I distressed the edges with the handy dandy Close to My Heart Edge Distresser and then lightly sponged those edges with Chocolate ink. This piece is matted on Chocolate cardstock that also has it's edges distressed.

The flower is made from old Just Blooms paper flowers. I learned this technique from Connie McFarlane, check out her video tutorial here.

The word "garden" is stamped with the Hodge Podge Alphabet stamp. The butterfly is from the Celebrate Life stamp set.


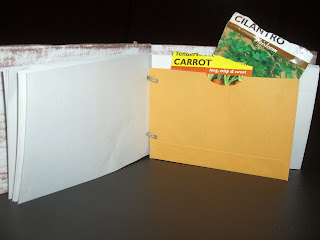
For the inside pages, I just used an old (kid's) sketch book that my son only used a few pages out of. After all--that is what this journal if for; to sketch my garden layout, and record ideas or changes for the following year. I'm also planning on adding pictures of the garden and favorite flowers!

I also used a 6x9 kraft envelope for pockets to hold seed packets that were used. I trimmed the kraft envelope 4" from the bottom for one pocket, then closed and sealed the flap of the envelope and trimmed to 4" for another pocket. To keep with the rustic look, I used twine for the binding.
I have room for five years of garden notes in this journal!

Close to My Heart products:
My Acrylix Stamp Sets: Treasure Life, Hodge Podge Alphabet, Celebrate Life (retired)
Exclusive Inks: Chocolate, Black, Honey
Cardstock: Colonial White, Chocolate

Edge Distresser

Hoping you find some joy today!
Cheers,
Lisa

8.12.2011

Follow Your Dreams


This envelope mini album is for a niece of mine who is a dancer. I'm hoping she fills the book with pictures and notes from all her performances.
It is made with 6x9 kraft envelopes that were folded in half. The covers are cardboard from a cereal box, covered with paper.

I made the flap at the opening of the envelope bigger, so it can be used for more pictures and journaling.


On a two page spread like this, two 4 x 5 1/2 pictures and one cropped photo, 3 x 5 1/2, will fit. The hearts are only glue on the far right so picture can slip under them.

The pocket holds a card that is 4" x 5 3/4" and can have a picture on the front with journaling on the back.


On a 2 page spread like this, two (3 1/2 x 5 1/2) will fit.


Close to My Heart paper packs that were used were You and Me and Mulberry. They were both out and I realized that they could work together!

Here are the backs of some of the cards in the pockets.

I had so much fun making this, I love making mini albums out of envelopes!
Now, I just need to get it in the mail since it is a late birthday gift!
Have a great day and weekend everybody! I'm leaving in a few hours to visit family and friends in Kansas City!

8.11.2011

Saturday Scrap Challenge #1

Kimberly over at Scrap It Girl has started a new challenge. She wants us to get back to the basics of scrapbooking. For the challenge, no digital images, no kits, and no sketches are allowed. She wants us to get back to using our imaginations, when all we used were paper, layers, textures and household items. I loved this idea; when I go back and look at older layouts; what I love about them (besides the adorable pictures!) is the simplicity of the layouts. So I hopped on board with her first challenge and it was so much fun--and fast! I went to my ever growing pile of pictures just grabbed the pack that was on top and that is what I was going to work with!


Granted, I had other visions for this layout when I first got the pictures, back in 2009, but it never got completed--probably because I had imagined a more detailed, time involved layout! Even though this is super simple, I'm happy with the result and better yet I'm happy that I have completed a layout! (it is so hard to take pictures of a 12 x 12 layout, but what I love about blogger is that you can click on any pictures to see it bigger!)

Check out Scrap It Girl's website to find out the details on her challenge. Just click on picture below. OH!! I have to mention that there is a prize for this challenge!

Link

This challenge also inspired me to go through those old albums and share.

12 years ago we took a wonderful vacation and I scrapped it just on 8 1/2 x 11 pages, stuck them in regular page protectors and used a 3 ring binder for my album! I mostly just matted the pictures, used some stamps to decorate and cut up brochures to give information about where the picture was taken. (and nope, I didn't spray those brochure pieces with an archival spray--yikes!!) But I just love the simplicity of these layouts! And I did them without page maps or idea books!!
I have a lot of layouts like this next one, with pictures cut in circles or ovals. This is something I never do anymore; I just don't like the look, but I still love these old layouts!


On this next layout, I actually used the Happy Meal bag for embellishing! That cute little baby of mine will be 13 years old in a few days--I just can't believe it!


This was fun, I'd love to see some early layouts of yours!
Have a great day!

8.07.2011

Toilet Paper Roll Wreath!

I was totally inspired by Alisa Burke with recycling toilet paper rolls. You can see her wreath and a tutorial here. I learned how to make the button carnations from Connie McFarlane, you can go here and find out how to make them. She really is a master of flowers, spend some time there and you can learn all sorts of fun things.

I tried to get better pictures of the wreath, but just couldn't.
It really is prettier than it looks in these pictures.

Can you guess what room of the house my wreath is hanging?
(that would be the craft room bathroom!)
Thanks for looking in today.
Hope everyone is able to find a cool spot to relax in today!